Introduction to Appwrite Cloud Functions with Android and Kotlin

Student @ National Institute of Technology, Delhi.
Android | Kotlin | Go | Python
In this article, we'll take a look at Cloud Functions in appwrite.io and how to use them with Kotlin or Android.
Here's an overview of what we'll be doing.
- We'll create a classic "Hello, World!" program with functions
- We'll write a function to get Covid-19 stats from Covid19Api
- We'll build an android app around the above function
Before we start, if you like to dive directly into the code, here's the github repo
Creating a new Appwrite project
Before we dive into creating functions, let's set up a new Appwrite project to which we will add our functions. If you already have an appwrite project you can skip this section.
To get Appwrite up and running, follow these instructions and create a new account.
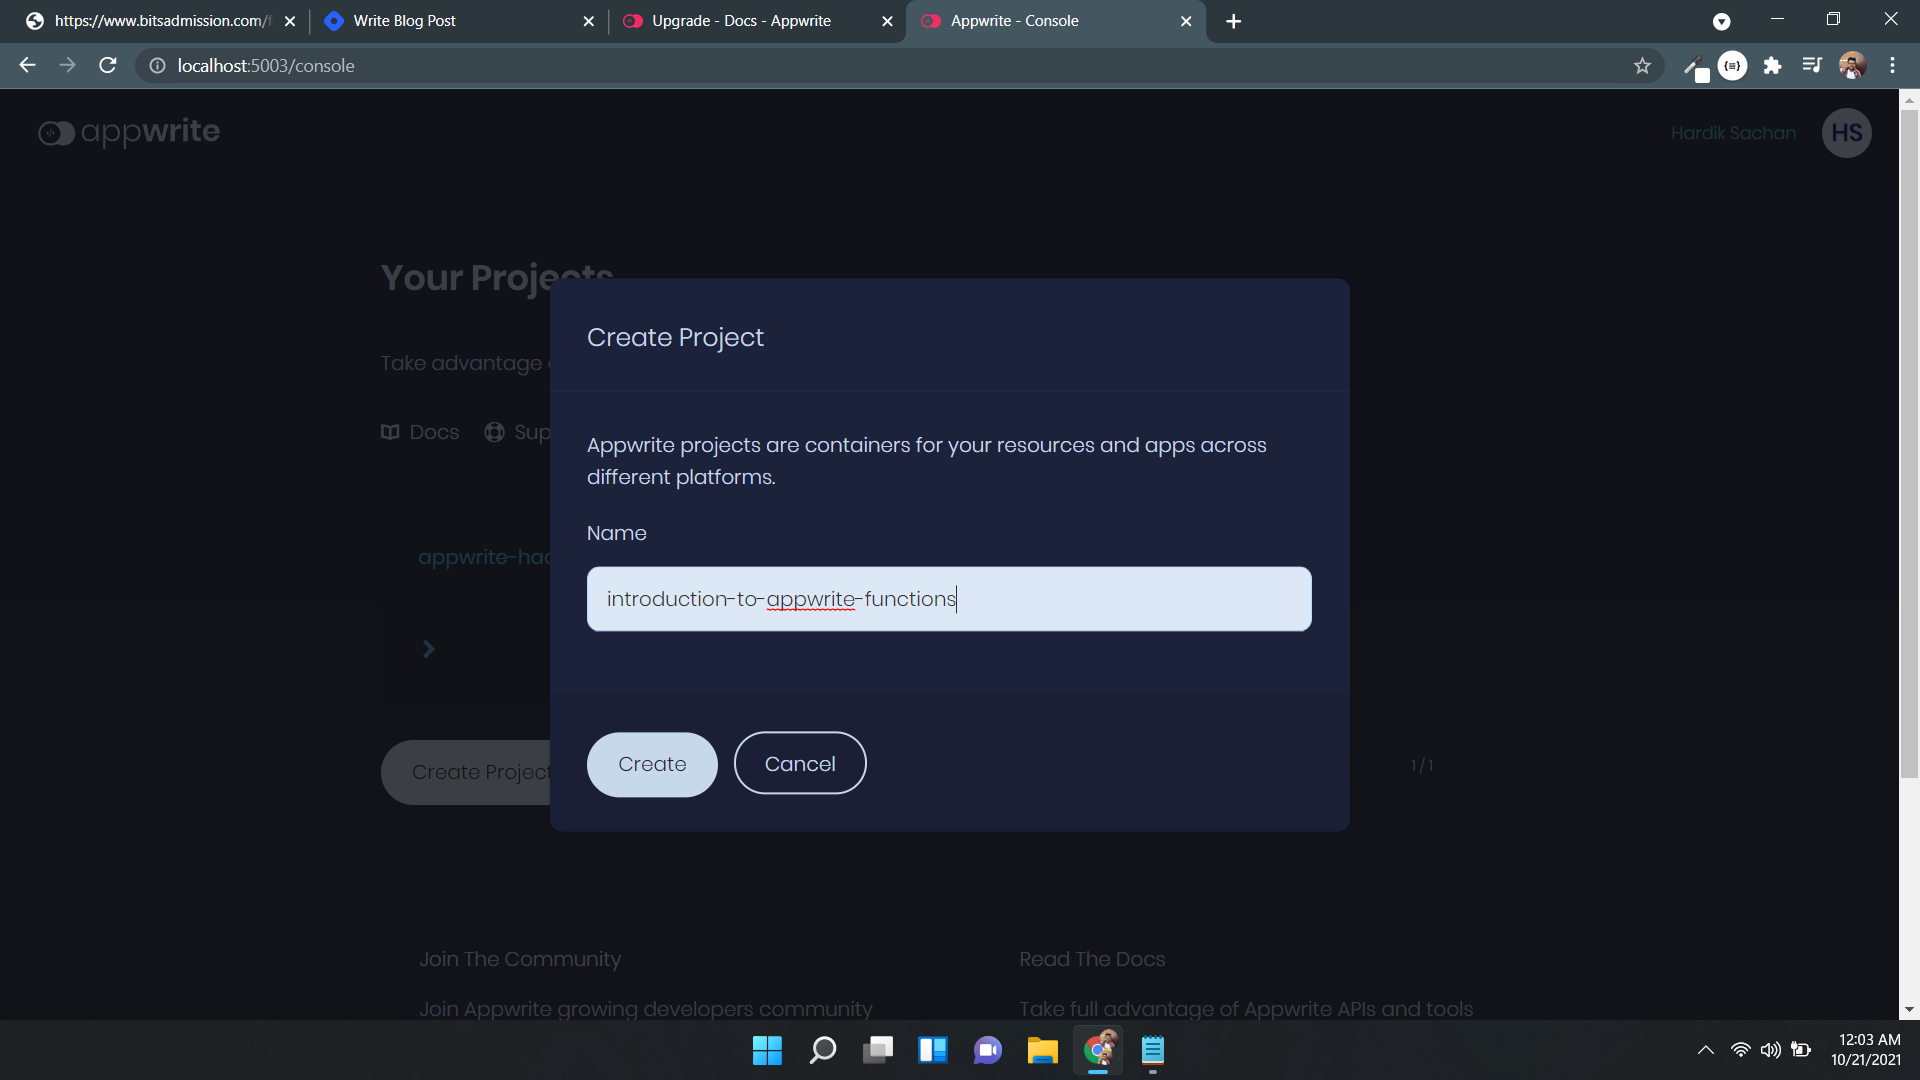
Next, follow the onscreen instructions to create a new project -
Hello World with Appwrite Functions
This is a pretty basic project to implement but it will make us familiar with the process of creating a new Appwrite Function. Let's get started -
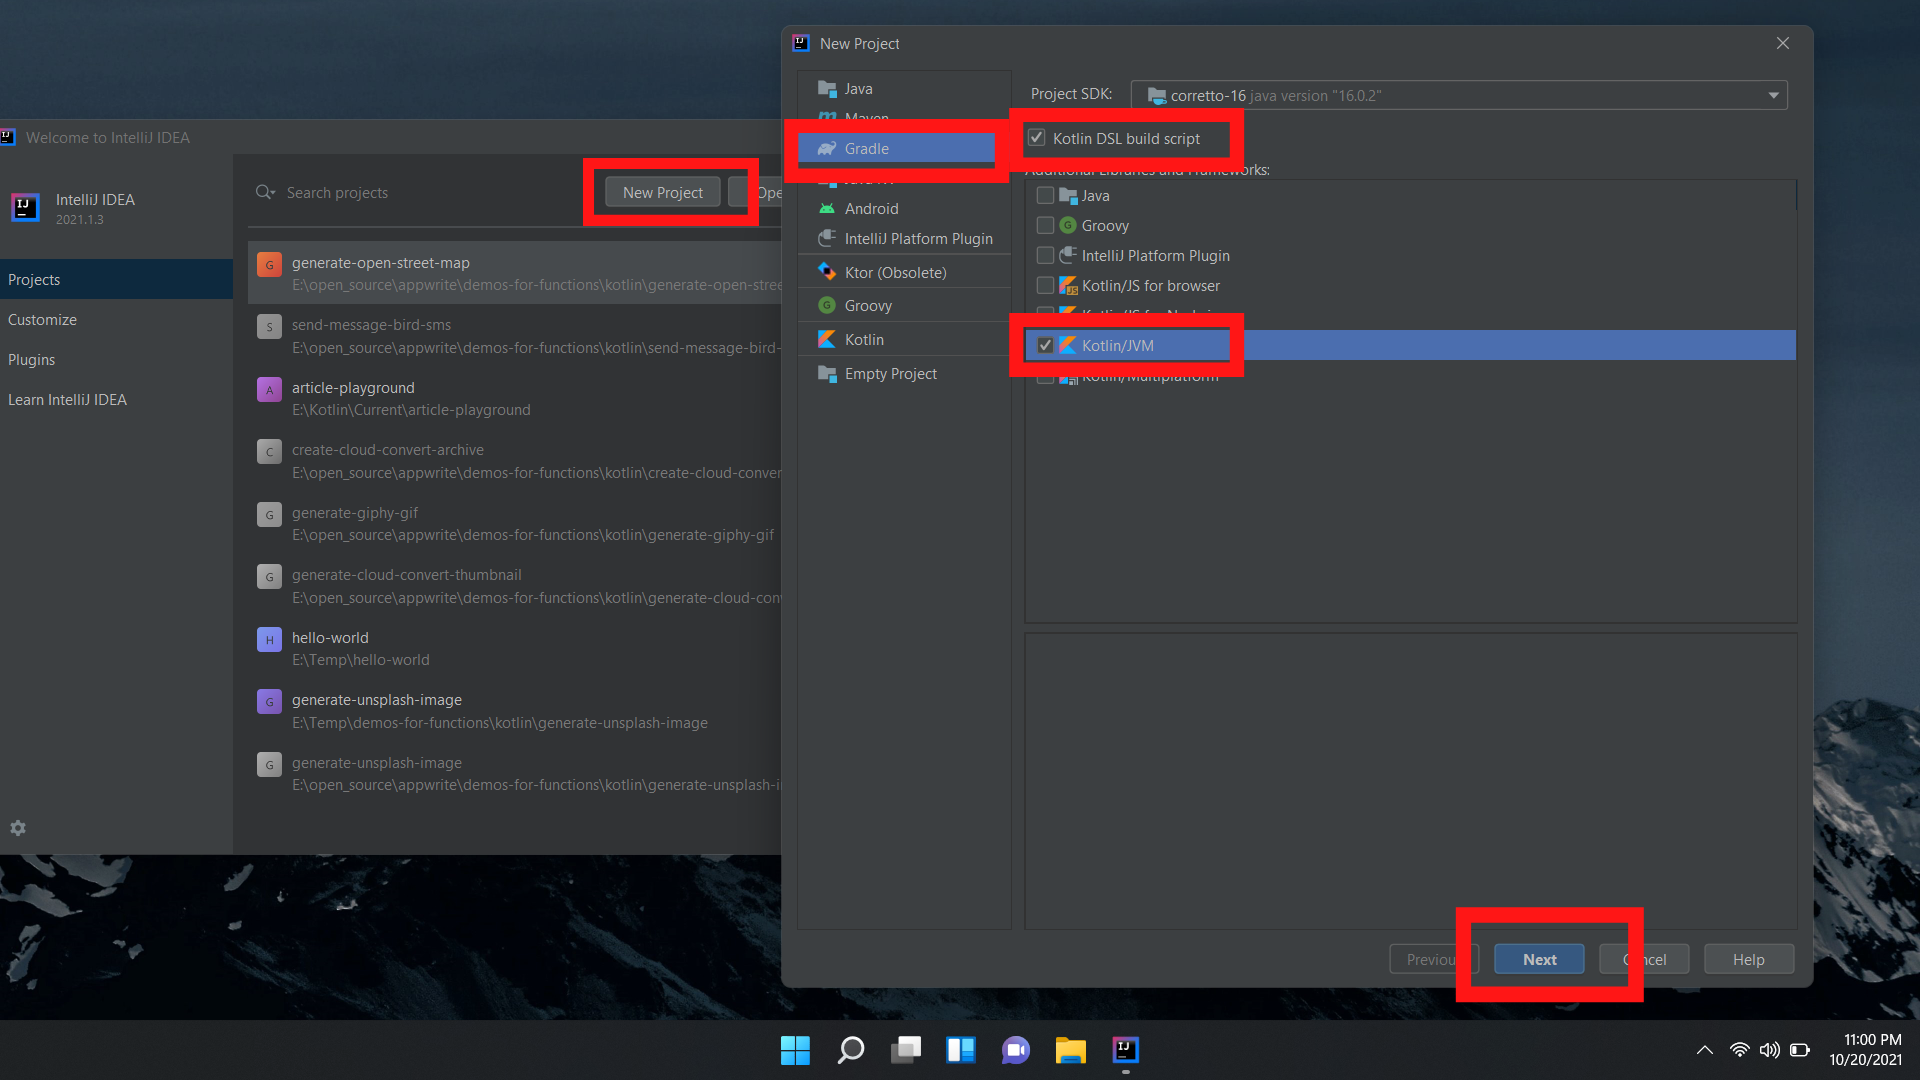
First of all, we need a new Kotlin project, I'm going to use Intellij Idea as an IDE with gradle build system.
Here's the configuration I'm using to create a new project -
Next, let's create a new file named Main.kt in hello-world/src/main/kotlin and put the following code in it -
fun main() {
    println("Hello, world!")
}
...and we are done!
Now let's add this to an Appwrite function.
Appwrite requires us to create a "fat jar" which is just a fancy way of saying that we need to include all runtime dependencies in our jar file. To achieve this we have to add the following lines to build.gradle.kts -
tasks.withType<Jar>() {
    manifest {
        attributes["Main-Class"] = "MainKt"
    }

    from(sourceSets.main.get().output)

    dependsOn(configurations.runtimeClasspath)
    from({
        configurations.runtimeClasspath.get()
            .filter { it.name.endsWith("jar") }
            .map { zipTree(it) }
    })
}
These lines basically instruct Gradle to build a "fat jar". Now to actually build a jar, we need to run the following task -
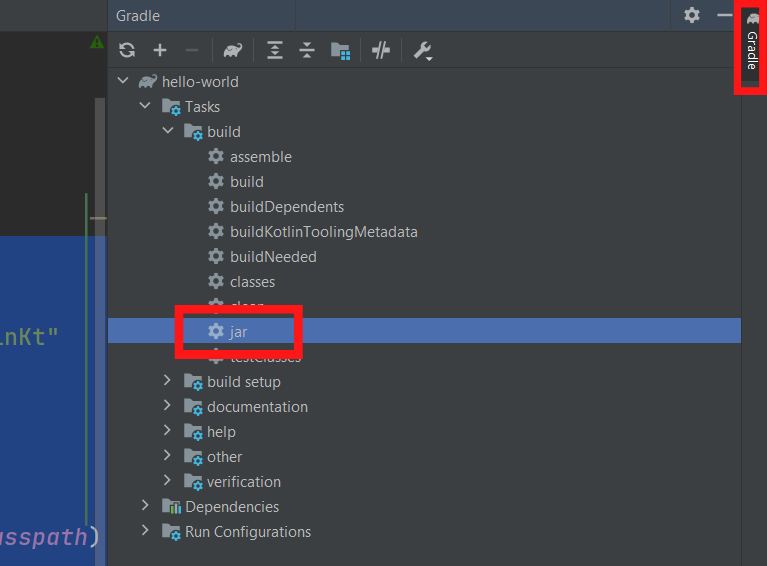
This will create the required jar file in hello-world/build/libs/hello-world-1.0-SNAPSHOT.jar
Now, to upload this to Appwrite we need to package this in a tar file. To do this run the following command inside the libs directory -
tar -zcvf code.tar.gz .\hello-world-1.0-SNAPSHOT.jar
This will create a file named code.tar.gz in the libs directory. We will need this file later.
Creating a new Appwrite Function
Now, let's create a new appwrite function from the appwrite console. Navigate to Functions tab on Left pane, and click on Add Function button. Give it a name, in this case I'm using hello-world, and for the runtime, choose Java 16.0
Next, let's create a new deploy tag -
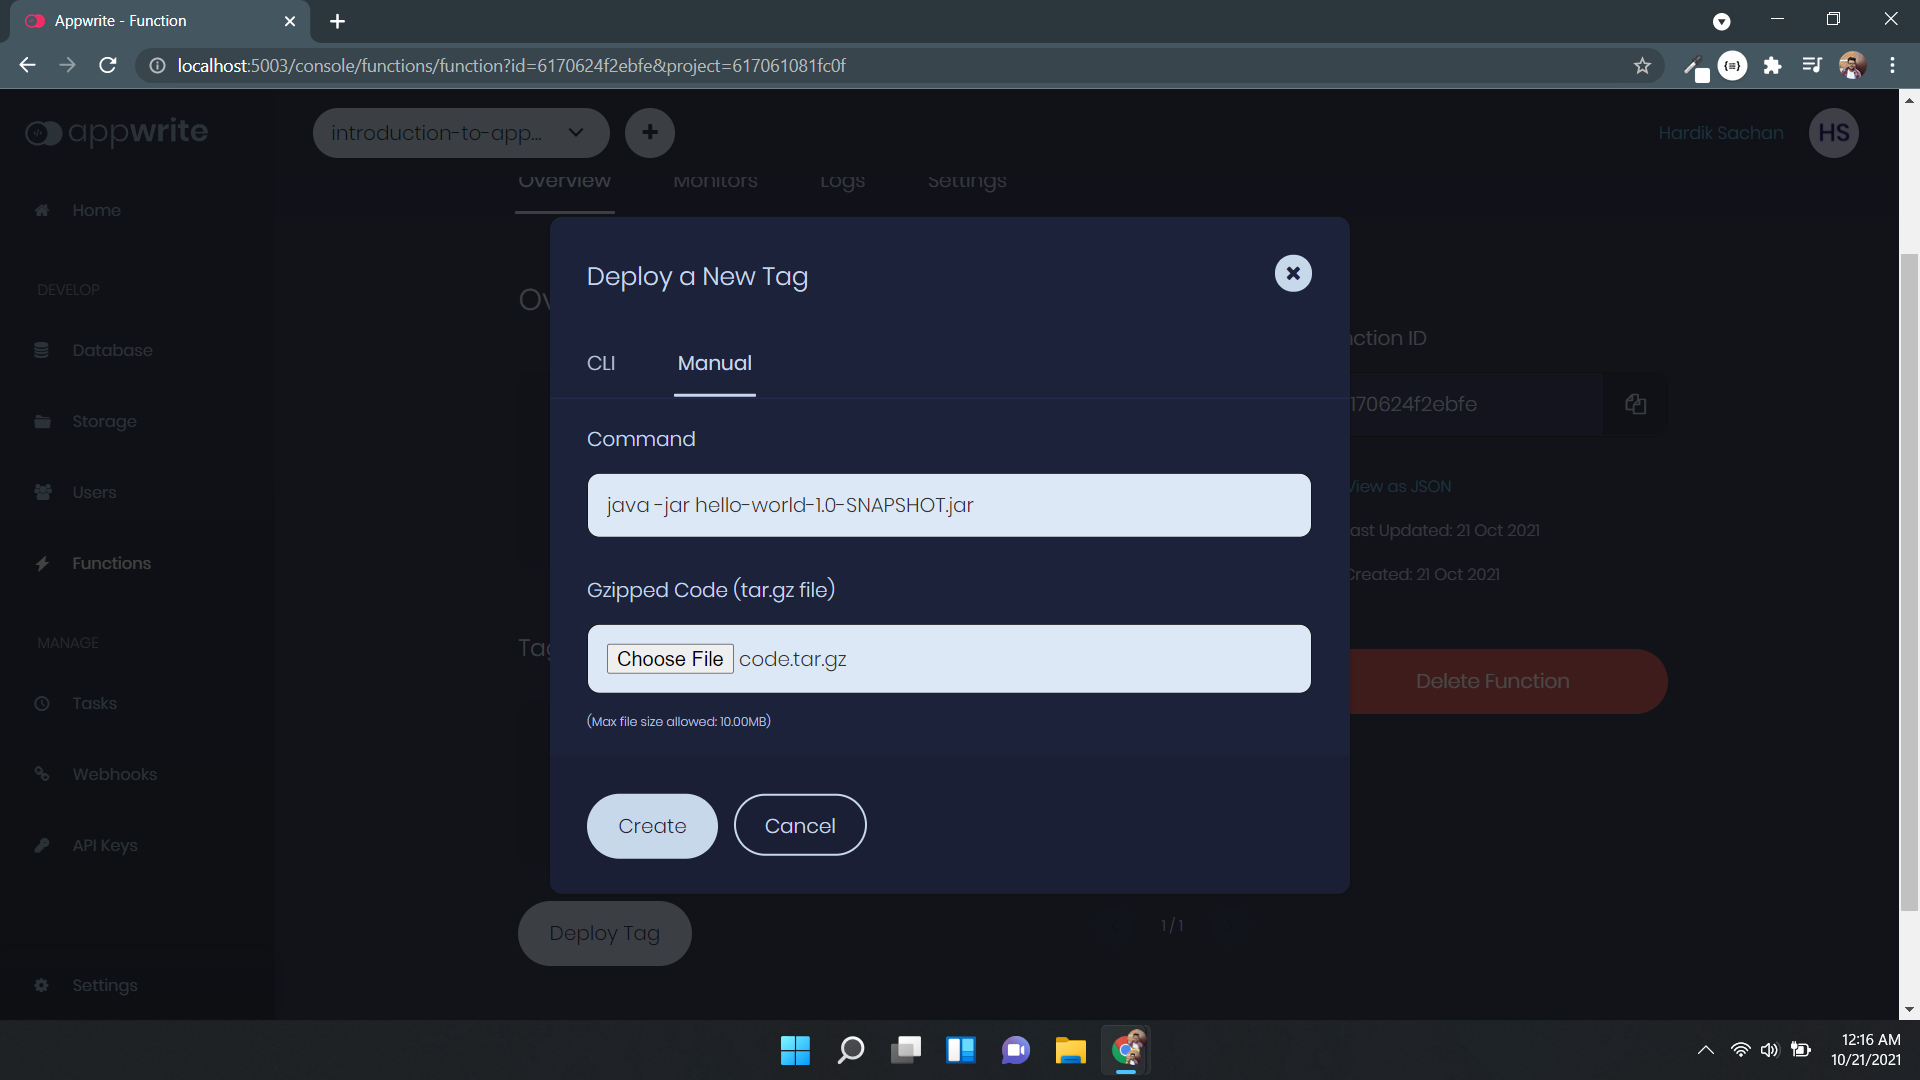
Here's the Command -
java -jar hello-world-1.0-SNAPSHOT.jar
Here we upload the tar file we created earlier. Click Activate and voila, we're done. :D
Let's test out the function. Click on Execute Now we don't need to pass any data to this function. Navigate to logs and check the output
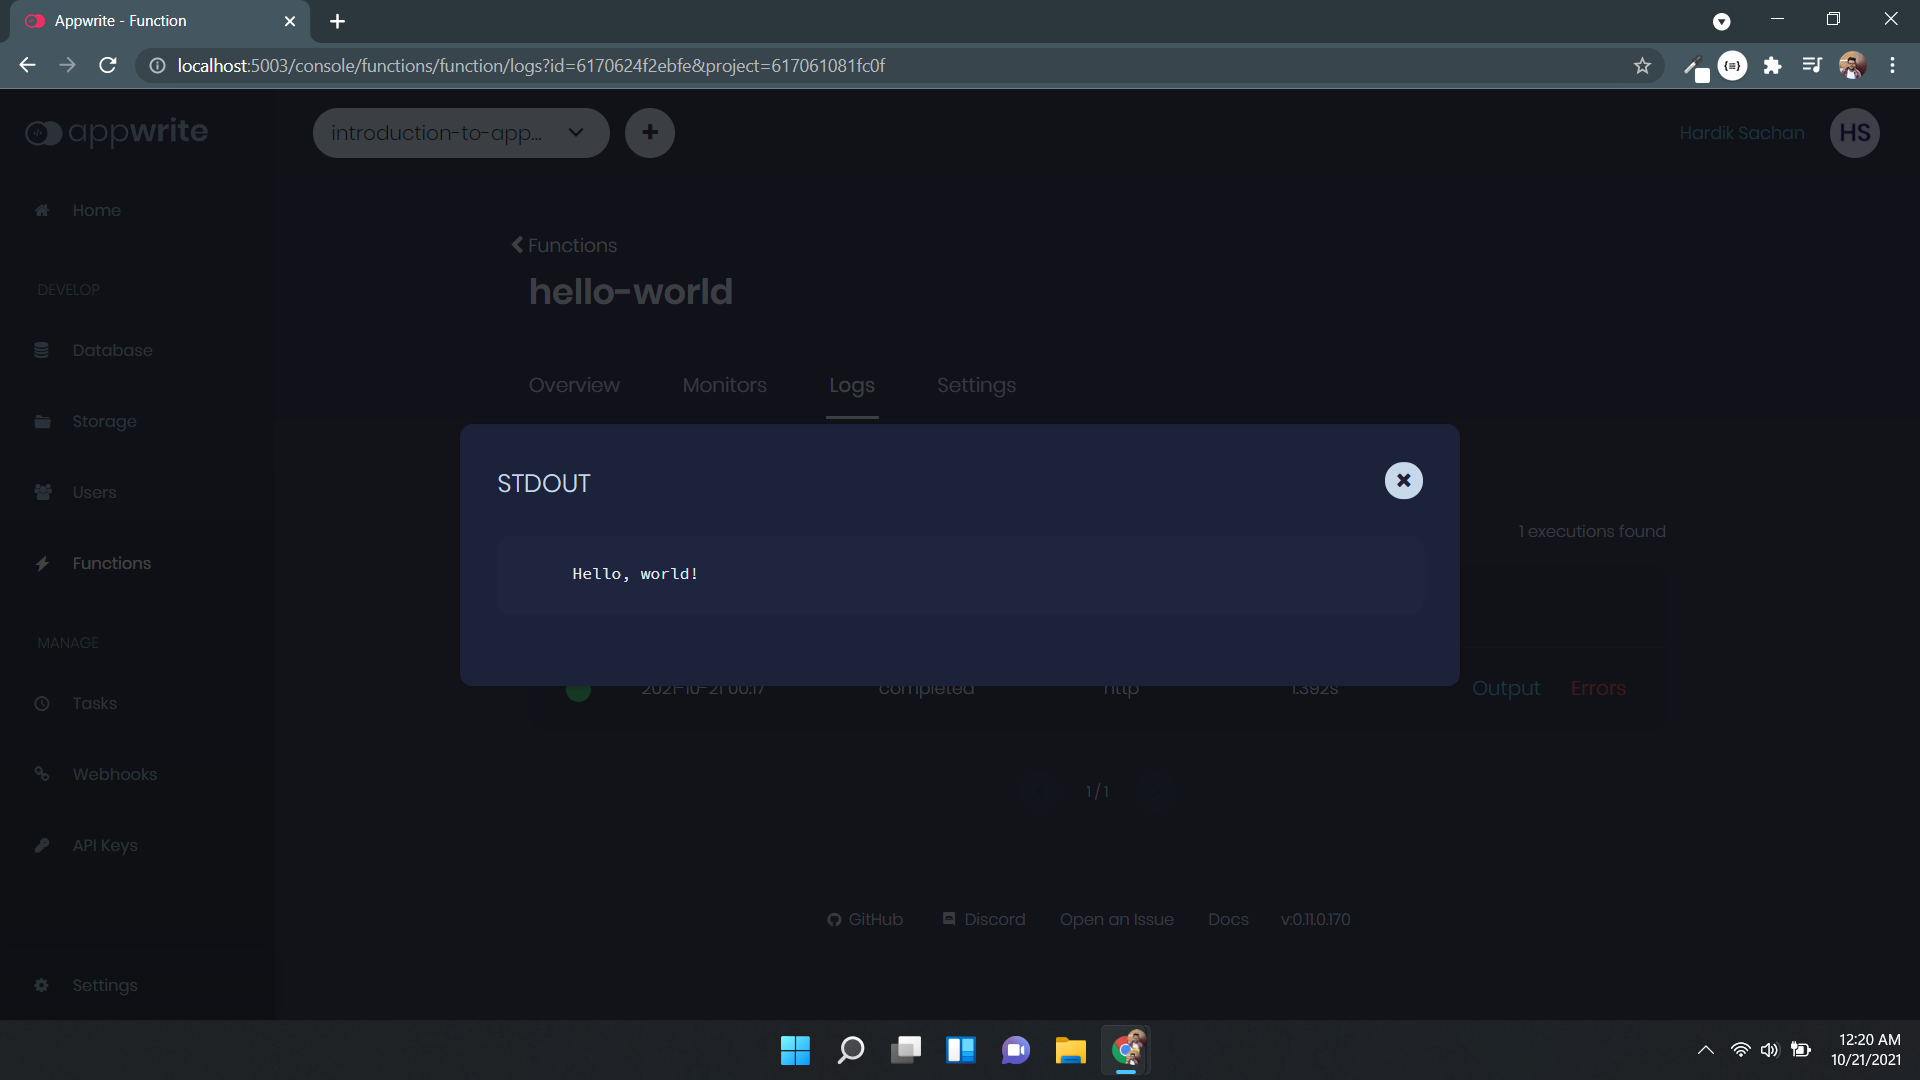
And you just created your first appwrite function. Cheers 🍻
A little upgrade
Now let's make this function a little more useful. Instead of printing Hello, world! all the time, we'll pass a name to this function.
A note on APPWRITE_FUNCTION_DATA and APPWRITE_FUNCTION_EVENT_DATA
As mentioned in the documentation, these environment variables contains the information pertinent to execution of a custom appwrite function.
We use APPWRITE_FUNCTION_DATA when we trigger the function through Appwrite console or via SDK or HTTP API. This variable contains the data passed in those executions.
APPWRITE_FUNCTION_EVENT_DATA is used when the function is triggered by some event like inserting a new document. This variable contains information regarding that event.
Let's get back to the upgrade
Now we need to read the name from the APPWRITE_FUNCTION_DATA variable, to do this we add a new function -
fun getNameFromEnv(): String =
    System.getenv("APPWRITE_FUNCTION_DATA")
and update the println statement as follows -
println("Hello, ${getNameFromEnv()}!")
Let's build the jar and add a new deploy tag to our appwrite console. You can follow the same instructions from above. And then execute the function passing you name as input.
Let's test it out.
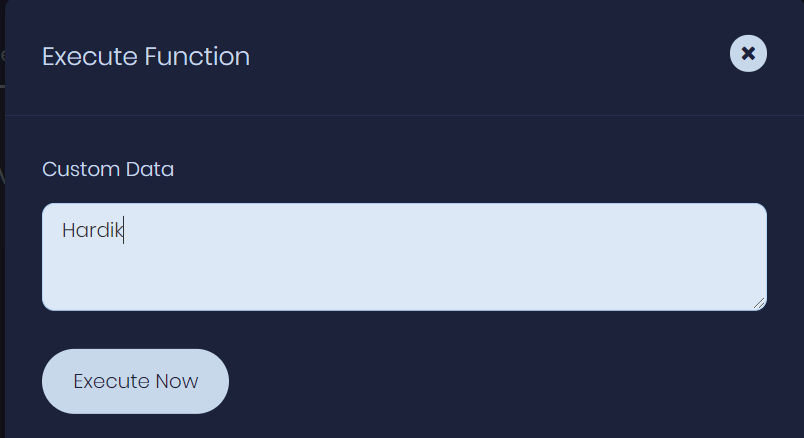
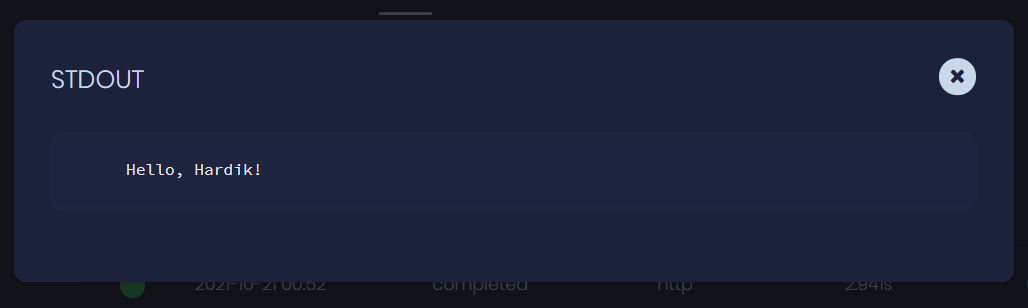
Yay! We're done. 🚀
Display Covid-19 stats
By creating the previous project, we got familiar with the process of creating a new Appwrite function with Kotlin. Now, let's build another project which is a little more complex. In this project, we'll see how we can integrate an Appwrite Function with a third-party API. Let's get started.
We will be using Covid19Api to get the data.
Before we dive into implementing the function, let's take a quick look at the requirements of what we'll be building -
- First, we need to read the country from
APPWRITE_FUNCTION_DATA. - Now, we need to check if the country is valid.
- If the country is valid, we return the stats for that country.
- If the country is not valid, we return global stats, with a message indicating the country was not valid.
Let's first create a new project. I'll name it get-covid-stats. Then we need a Main.kt file in get-covid-stats/src/main/kotlin.
Now we need to read the country name from APPWRITE_FUNCTION_DATA. Let's do that -
fun readCountryFromEnv(): String =
    System.getenv("APPWRITE_FUNCTION_DATA")
and in main let's call it -
suspend fun main() {
    val country = readCountryFromEnv()
}
Next, we need to install some dependencies. We need to make Network Requests for that, I'm going to use Ktor HTTP Client and to parse json let's use kotlinx.serialization. If you don't know these libraries, don't worry, I'll explain how they work. To install these dependencies add the following lines to build.gradle.kts -
dependencies {
    // ....
    implementation("org.jetbrains.kotlinx:kotlinx-serialization-json:1.3.0")
    implementation("io.ktor:ktor-client-core:1.6.4")
    implementation("io.ktor:ktor-client-cio:1.6.4")
    implementation("io.ktor:ktor-client-serialization:1.6.4")
}
There is one more line we need to add for kotlinx.serialization to work properly. You can read more about it here. Let's add the following line to build.gradle.kts -
plugins {
    // ...
    kotlin("plugin.serialization") version "1.5.31"
}
Next, we need some classes to hold responses we receive from Covid19Api. We'll save the classes in model package. Let's create them -
First, let's create an interface with data we need to return in get-covid-stats/src/main/kotlin/model/ICovidStats.kt
package model

interface ICovidStats {
    val newConfirmed: Int
    val totalConfirmed: Int
    val newDeaths: Int
    val totalDeaths: Int
    val newRecovered: Int
    val totalRecovered: Int
}
Now, if we take a look at data returned from the endpoint we see we need three classes Response.kt, GlobalStats.kt and CountryStats.kt. Let's create them -
// GlobalStats.kt

package model

import kotlinx.serialization.SerialName
import kotlinx.serialization.Serializable

@Serializable
data class GlobalStats(
    @SerialName("NewConfirmed") override val newConfirmed: Int,
    @SerialName("TotalConfirmed") override val totalConfirmed: Int,
    @SerialName("NewDeaths") override val newDeaths: Int,
    @SerialName("TotalDeaths") override val totalDeaths: Int,
    @SerialName("NewRecovered") override val newRecovered: Int,
    @SerialName("TotalRecovered") override val totalRecovered: Int,
) : ICovidStats
@Serializable tells kotlinx.serialization that this class can be parsed to/from JSON and @SerialName is used to indicate the JSON field name.
// CountryStats.kt

package model

import kotlinx.serialization.SerialName
import kotlinx.serialization.Serializable

@Serializable
data class CountryStats(
    @SerialName("Country") val country: String,
    @SerialName("CountryCode") val countryCode: String,
    @SerialName("Slug") val slug: String,
    @SerialName("NewConfirmed") override val newConfirmed: Int,
    @SerialName("TotalConfirmed") override val totalConfirmed: Int,
    @SerialName("NewDeaths") override val newDeaths: Int,
    @SerialName("TotalDeaths") override val totalDeaths: Int,
    @SerialName("NewRecovered") override val newRecovered: Int,
    @SerialName("TotalRecovered") override val totalRecovered: Int,
) : ICovidStats
// Response.kt

package model

import kotlinx.serialization.Serializable
import kotlinx.serialization.SerialName

@Serializable
data class Response(
    @SerialName("Global") val global : GlobalStats,
    @SerialName("Countries") val countries : List<CountryStats>,
)
Okay 🤯, these are the response models we need.
We also need an object which we will return from this function. Let's do that -
// FunctionResult.kt

package model

import kotlinx.serialization.Serializable

@Serializable
data class FunctionResult(
    val isGlobal: Boolean,
    val newConfirmed: Int,
    val totalConfirmed: Int,
    val newDeaths: Int,
    val totalDeaths: Int,
    val newRecovered: Int,
    val totalRecovered: Int,
)
We will also need a JSON Parser, Let's set up kotlinx.serialization json Parser -
val jsonParser = Json {
    isLenient = true
    ignoreUnknownKeys = true
}
Next, let's get the stats from the API. First, we need an HTTP Client to make the requests. Let's do that -
HttpClient() {
    install(JsonFeature) {
        serializer = KotlinxSerializer(json = jsonParser)
    }
}
Here, we also install JsonFeature which automatically parses the response to classes we created earlier. Now, let's use this client to make a get request to https://api.covid19api.com/summary.
HttpClient() {
    // ...
}.use { client ->
    val response: Response = client.get("https://api.covid19api.com/summary")
}
Now let's get the country or global data from this and create a FunctionResult object -
val result: FunctionResult = response.countries.find {
    it.country.equals(country, ignoreCase = true) ||
            it.countryCode.equals(country, ignoreCase = true) ||
            it.slug.equals(country, ignoreCase = true)
}?.run {
    FunctionResult(
        false, newConfirmed, totalConfirmed, newDeaths,
        totalDeaths, newRecovered, totalRecovered
    )
} ?: response.global.run {
    FunctionResult(
        true, newConfirmed, totalConfirmed, newDeaths,
        totalDeaths, newRecovered, totalRecovered
    )
}
Let's put this information in stdout -
println(jsonParser.encodeToString(result))
Here's the complete code -
import io.ktor.client.*
import io.ktor.client.features.json.*
import io.ktor.client.features.json.serializer.*
import io.ktor.client.request.*
import io.ktor.utils.io.core.*
import kotlinx.serialization.encodeToString
import kotlinx.serialization.json.Json
import model.FunctionResult
import model.Response

suspend fun main() {
    val country = readCountryFromEnv()

    val jsonParser = Json {
        isLenient = true
        ignoreUnknownKeys = true
    }

    HttpClient() {
        install(JsonFeature) {
            serializer = KotlinxSerializer(json = jsonParser)
        }
    }.use { client ->
        val response: Response = client.get("https://api.covid19api.com/summary")

        val result: FunctionResult = response.countries.find {
            it.country.equals(country, ignoreCase = true) ||
                    it.countryCode.equals(country, ignoreCase = true) ||
                    it.slug.equals(country, ignoreCase = true)
        }?.run {
            FunctionResult(
                false, newConfirmed, totalConfirmed, newDeaths,
                totalDeaths, newRecovered, totalRecovered
            )
        } ?: response.global.run {
            FunctionResult(
                true, newConfirmed, totalConfirmed, newDeaths,
                totalDeaths, newRecovered, totalRecovered
            )
        }

        println(jsonParser.encodeToString(result))
    }
}

fun readCountryFromEnv(): String =
    System.getenv("APPWRITE_FUNCTION_DATA")
Whew, that was a lot of code. Let's add our function to appwrite console (see steps in above example) and test it out.
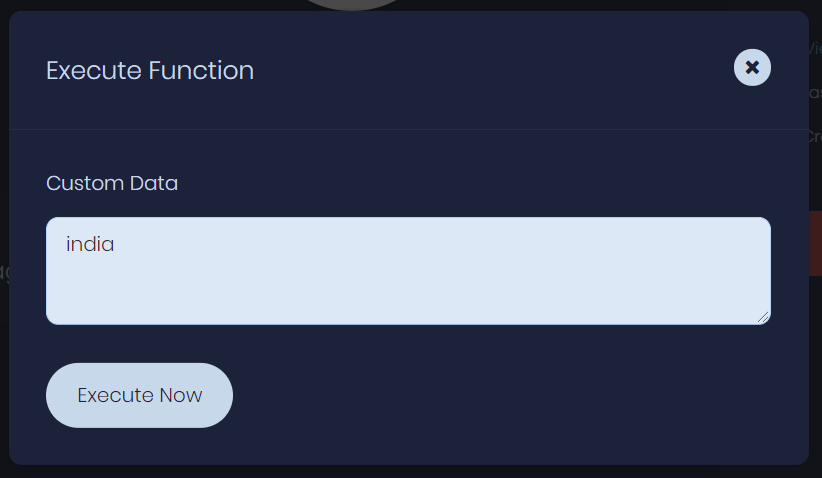
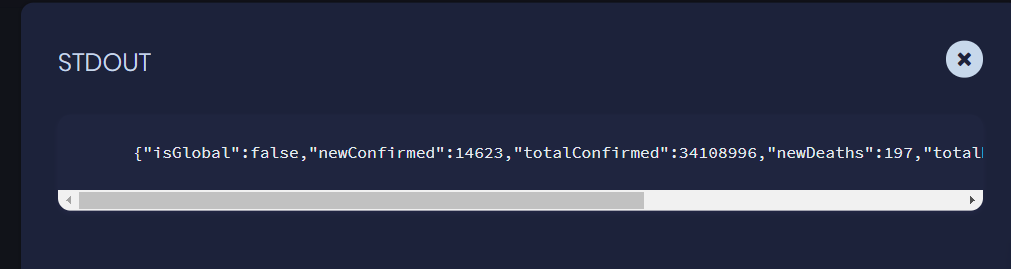
Here's what it prints -
{"isGlobal":false,"newConfirmed":14623,"totalConfirmed":34108996,"newDeaths":197,"totalDeaths":452651,"newRecovered":0,"totalRecovered":0}
Alright! In this article we learned the basics of Appwrite Function Service. In the next post, I'll show you how to connect an Appwrite Function to an android application. Stay tuned for that.